OB Ghetto Guide to Home Grown Chillis - Part 2: TransPLANTing
So in Part 1 we tackled the first part of growing your chillies at home - planting and germinating your chilli seeds. Since then, it's been about 2 weeks since Day 1 of germination and most of our seeds have popped their heads out (WOOHOO we did it!).

Unfortunately one of our Dracs lost its head.... RIP little homie

In Part 2 of this ghetto grow guide, we are going to look at transplanting your seedlings from the seed tray to their new pots, the type of soil to use, watering, and the best spots to keep seedlings to get them thriving!
What you need
- Your newly sprouted chilli seedlings
- Small 100mm pot ($0.89 at Bunnings) - we like to use a clear plastic pot to see the root growth but any 100mm grow pot will do!
- Some seedling soil (10L bag of Osmocote Seed & Cutting Potting Mix $7.26 at Bunnings)
- Spray Bottle (from part 1 - $1.55 at Bunnings)
- A spoon
**Disclaimer: This series is not sponsored by Bunnings and you can get these products anywhere you like - but we absolutely rate the convenience of getting everything in one place

The Soil
Soil is really important at this point in your plants' lives. They're pretty fragile and can take a turn pretty quickly so it's really important to use a "seedling raising" or "seed raising" soil. This type of soil is a lot finer than normal potting mix, which allows your little buddies' roots to grow strong without any obstacles like bark. The soil is also fertiliser free - most potting mixes have some type of premixed fertiliser in them which are too strong for your newly sprouted homie and will most likely nute burn them to death (its as bad as it sounds!)
The Process
First, you want put the seed raising soil into your pot, I like to use clear pots - this allows you to see the roots of the plant which not only looks cool, but it makes it way easier to tell when your plant needs a repot. Make a small indent into the soil with your spoon.

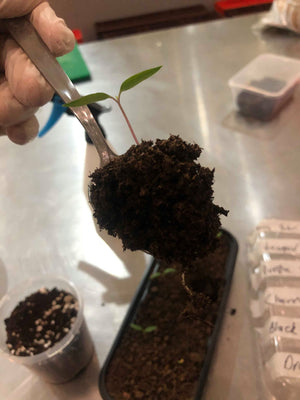
Next use the same spoon to scoop your seedling out of the jiffy tray. Don't be shy - make sure you go deep! Hit the bottom so you get all the roots.

Look at that root!

Carefully place your seedling into its new pot, and lightly cover with extra soil.


Give that bad boy a spray and you're done!

Where To Keep Your Chilli Plants
The age old question - do I grow chilli plants indoors or outdoors?
Because your seedling is still finding its feet, I always suggest keeping it indoors (especially in winter). Place it by a sunny window - the more light it gets the better.
Another (way cooler) option is to buy a full spectrum LED light. These lights are easily found online, you can pick some up pretty cheap on eBay or from companies like Urban Plant Growers. They give your plant the perfect amount of light to keep them cranking and they are a pretty cool addition to your place!

Watering
LISTEN UP! This is important... Lots of people (myself included) have been guilty of giving your plant too much love! Overwatering is probably the most common thing that kills newly sprouted seedlings. So how often should you water a chilli plant?
You want to keep the soil moist, not wet or dry. This is why we use a spray bottle - it allows you to lightly mist the soil, rather than straight up watering which can also compact the soil and make it harder for the roots to grow. Spray your plants once a day, at the same time everyday if possible(routine prevents over and under watering). As your plants get bigger give them a few more sprays!

And you're done! In Part 3 we'll be looking at repotting, how to feed your homie, managing pests (argh!! they suck) and prepping your plant for the outdoors (if thats your plan). Stay tuned!
We wanna see your home grows - tag us in your pics @obchillico on Instagram or send us your photos!